Happenings....
Today my firstborn turns 15!
Seriously, I do not know where the time has gone....I remember rocking him as a newborn, and thinking that we had forever until he would be a teenager. Forever went by in a blink and now I have a handsome, 6 ft tall, hairy man child. I also remember that it wasn't too long ago when his little voice came from the back seat of the car and said "mommy, I don't want to be a teenager... because teenagers don't think their parents know anything, and they treat them bad. I don't ever want to be that way with you and dad." He didn't see, but I had tears streaming down my face. Little stinker!
I am happy to say that he does not treat us bad, and there is much love. "C" keeps us all laughing with his super quick wit, famous movie lines at just the right moment, and all around hilarious antics..... and even though there have been times where he doesn't love what we have to say....his heart is soft and teachable and he is a pleasure to be around.
Love you "C".....so proud you're my boy.
xo,
Mom
FYI
For the past couple weeks we have been working on switching the guest bedroom and my son C's bedroom. I thought I would give you a very sneak peek of the progress we have made......there is yet to be a new light fixture, new window treatments, artwork and found objects on the walls, etc. So far, we have painted, built a platform bed, and moved in the Union Jack.....but it was enough to make me a really happy camper, and spur me on to finish. Remember we had a week of vacation in there somewhere, so it is back to sorting and moving everything from one place to another.
Yesterday, C and JB sorted through the piles of "belongings" and organized everything into three piles: keep, goodwill, and attic. So, a big part is behind us...now, we just have to nail down artwork and placement of things and we will be in business.
I cannot believe how gorgeous and bright it is in this room now compared to the previous color, and will be painting the guest bedroom the same color. The color is called Chocolate Froth by Behr paint, and the name is completely deceiving because when I think chocolate I think brown....but this is the creamiest, frothiest, pale gray you have ever seen. Totally awesome, and the fact that "froth" is in the name ......WIN!
I promise to show whole room pics when it is all done. But for now just relish the sneaky peek!
Enjoy today!
xo,
Barb
Roomage
 |
| roy g biv |
 |
| apartment therapy |
 |
| abode love |
 |
| design sponge |
 |
| home town girl |
 |
| because it's awesome |
 |
| a sense of design |
 |
| the paris apartment |
My sweet, sweet mom asked me to help her start brainstorming some ideas for her sun porch that she is getting ready to transform. So, I started looking around for some goodness all the while thinking of her criteria: comfortable seating that can be used as an extra bed, great rug{s}, place for the grand kids to play/hang, and storage. You may find that my collection of photos is a little all over the place....but there is a method to my madness! I love parts of every photo, and I will explain below.
It was hard for me to pinpoint one porch that completely captured my mom and her style, so I just pulled together some inspirational photographs that had some really cool design ideas:
1. great rugs, and the layering of different sizes and colors is casual and fun.
2. again, love the rugs.....and even though the bed is a little small I love the way it looks with the stack of books beside it. Also, the artwork on the wall reminds me of how much my mom likes to display her kid's artwork, and I think the porch would definitely need some artwork from the grandkids!
3. love the window trim in this photo, and the beautiful gray blue shade. The colors of this whole photo are very soothing.
4. I think a blue ceiling is a must, and my mom will not like the couches here, but I would! hee hee!
5. Everyone knows that a painted chest of drawers is so multi functional and perfect for all of your storage needs! {wink!}
6. This bench is perfection, and a fun DIY that dad and I could make!
7. "I do not like all the white and tan, I do not like it sam I am" {in my best Dr Seuss voice} but I do love that this daybed could be an extra bed or a comfy reading spot with storage to boot.
8. I threw these guys in for fun because who wouldn't want to have a grouping of succulents to stare at every day while on your porch?!
Porches are great.
Hope you like these ideas mom!
xo,
Barb
FYI
I know that most of you all have already seen, and heard the exciting news about the Design Sponge book coming out in September.......but I just wanted to add my excitement and put in my two cents about how beautiful the cover design is!
I am so excited to have a few of my projects in this book, and was part of the editorial team during a lot of the decision making time for this book. Grace would send all of us editors sneak peeks at the designs and we would all give feedback. I have to say that this final book cover by Julia Rothman is something to be really proud of......and is really clean, simple, and beautiful! Then you add in this happy and beautifully well done video by Ryan Marshall....and there is just a whole lot of good going on!
I know this has been a very hard and long couple of years for the Design Sponge team, and so I want to add my congratulations on a job well done and my happiness for the success and beauty of this labor of love!
P.S. the landing page for the D*s book where you can find all the information you need on pre ordering, book tour dates and more ...is right here!
xo,
Barb
Roomage
Today's roomage is all about kitchens! I had a sweet reader email and ask for some kitchen inspiration for her home, so I thought I'd round up some fun shots of easy and fun decorating ideas.
 |
| kitchen storage - great tutorial via here |
 |
| hello my darling! I just love this idea!......photo via here |
 |
| mismatched chair fabrics are so inviting. via pinterest |
 |
| image via sweetie pie style love the art assemblage on the wall |
 |
| via kitchenisms plates, plates and more plates! |
 |
| via tumblr {a chalkboard makes every kitchen better} |
 |
| via kitchenisms - a fabulous blog all about kitchens by the way...may want to check it out! |
 |
| via pinterest love the use of the pallet! |
 |
| via pinterest but also from kitchenisms :) love the eclectic warmth of this place. |
Hope you all enjoyed the view! If you haven't noticed already, I seem to be very drawn to a lot of the picks from the fantastic kitchen blog kitchenisms! Check it out for mucho, mucho more wonderful kitchen inspiration.
xo,
Barb
FYI
You all are in for a treat because miss Hattie graciously agreed to share this nifty little tutorial with all of us! Woot! It takes a little bit of "kadoodleing"....but I watched and photographed....and think I could make one myself ......:)
Instructions:
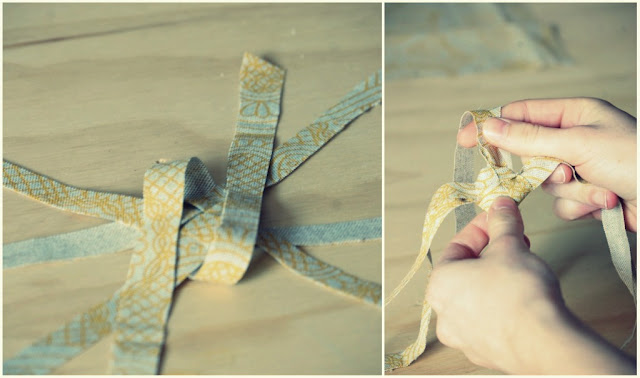
Step 1: Cut 4 long strips about 1/2 inches wide ea. from the fabric of your choice. You may cut more strips if you feel so inclined but it may get difficult to weave through the knob hole.
Step 2: Weave the pieces over and under each other so that they lay down like a # sign
Step 3: Take the two opposite strips and fold them diagonally across the woven center area.
Step 4: Take two of the crossed over strips {one from each side of the woven area} and tuck one through the formed loop of the diagonal strip, passing over the free diagonal strip. Do the same with the other side. This forms a box knot.
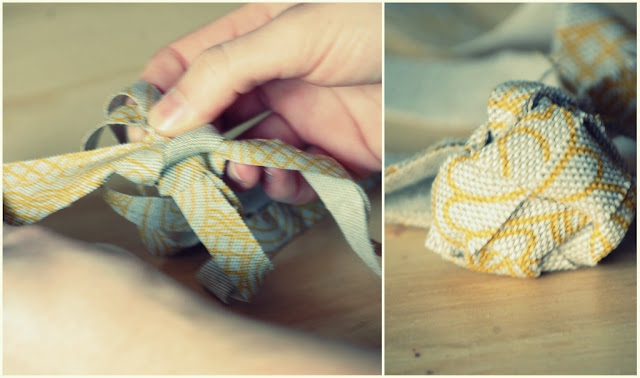
Step 5: Repeat step four with the other four cloth strips.
Step 6: Tighten and begin randomly knotting the remaining strips until you achieve a desired shape and size.
Step 7: Pull the dangling tassle-like cloth strips through the knob hole {this is where you might want to use the nail for help, and if you need to make your hole a little bit bigger you can. Just make sure you don't make it too big!}
Step 8: Tie the strips in a knot on the inside of the drawer to secure the knob. Make sure the knot is big enough to keep from pulling back through.
Ta da!!
xo,
Barb & Hattie


